
Please read the knowledgebase articles below to find solutions to common problems. If your problem persists, please contact us at support@waldenfont.com.
Before you get started you should turn off Word"s AutoCorrect features to prevent them from applying undesired formatting.
1. Go to Tools > AutoCorrect
Options > AutoFormat As You Type
2. Uncheck everything in the Apply as
you type section.
3. Click OK.

1. Choose Insert > Text Box from the menu and draw the box.
2. Adjust placement and size as needed.
Next, turn off the box"s default border
1. right-click the box
2. choose Format Text Box
3. click the Colors and Line tab
4. set the Color dropdown to No Line.

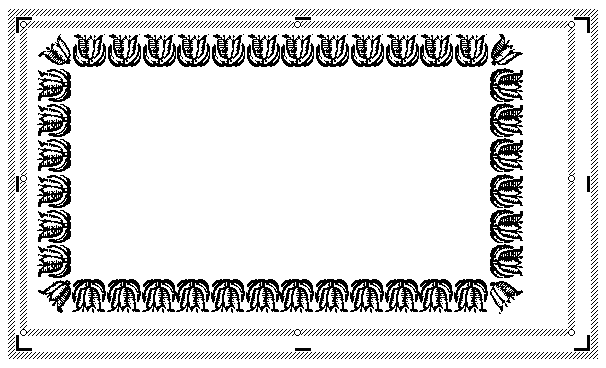
Now you"ll create the border or frame.
1. select your desired border font and size
2. look at the number pad on the right side of your keyboard (Use the
row of numbers at the top if
your keyboard doesn"t have a number pad)
3. the keys are arranged in a
square with the 7 forming the top left, the 9 the top right, 8 is the
top horizontal character, etc.
4. insert spaces to get the distance between the left and
right edges of the frame
5. using this schema, type
your frame.
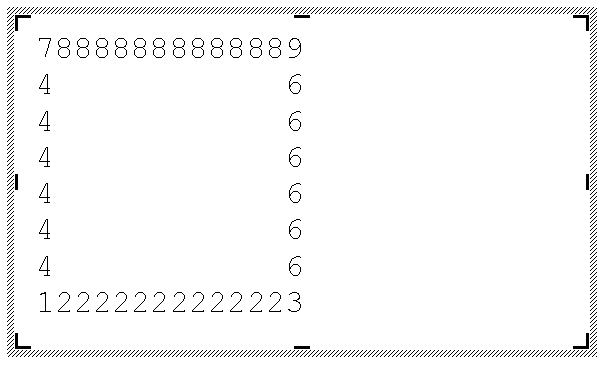
You should get a frame similar to the one below. To illustrate, I"ve switched the font back to a normal text font, so you see the numbers I typed to get the frame. You will notice that you can"t type text in the frame without upsetting the frame edges. We"ll get around that in the next step.
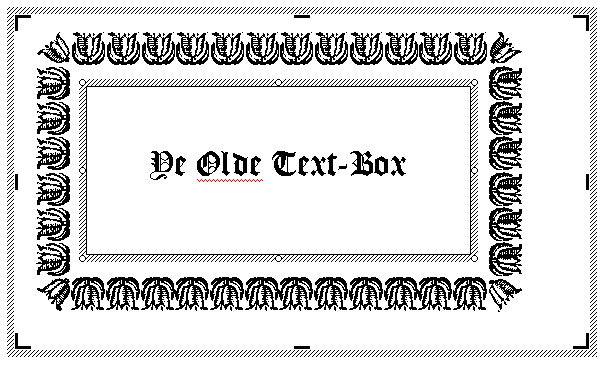
Once the frame looks the way you like it, create a second text box on top of the first one. This text box will hold whatever content you want to put inside the frame. Adjust the size and position of the box and get rid of its border as you did with the first one. Now place your text and / or images into the box.
You"re done!
This effect can be achieved using the mortise images supplied with the Minuteman Printshop.
The simplest method is to use Microsoft Paint(TM) or a similar bitmap-editing program to add a letter to a mortise image. Microsoft Paint(TM) is part of Microsoft Windows(TM).
1. Click START > PROGRAMS > ACCESSORIES > PAINT
2. Choose FILE > OPEN The mortise images should be located in the following folder: C:>Program Files>WaldenFont>MinutemanPrintshop>ClipArt>Mortises
3. Click the text tool (A). Click in the cutout area in the mortise.
4. Type the desired letter. Adjust Typeface and size as needed.
5. Use the small handles on the edges of the blue box surrounding the letter to adjust the size of the type area. It should fit in the cutout of the mortise.
6. Click FILE > SAVE AS and save your image. Be careful not to overwrite the original file.
You can now insert this image in your word processing software.